Photisan
How to convert film negatives in Photisan, step by step
Inverting a negative isn't enough: it comes out blue, with a cast that changes from the shadows to the highlights. What the lab did, how to digitize well and how to convert in Photisan, step by step.
A color negative is a photo turned inside out, and orange on top of that. The first thing anyone thinks of is to invert it, and what comes out is a bluish, dull image that white balance won't fix: correct the shadows and the highlights fall apart. For decades the lab took care of this, with its minilab scanner and an operator who knew what they were doing. Today more and more people digitize their own negatives, with a film scanner or a camera, and run straight into the problem. In Photisan, film conversion does the lab's work. This guide covers why inverting isn't enough, what the minilab did, how to digitize well and how to convert in Photisan, step by step.
Why inverting isn't enough
Color film has three layers, each sensitive to one part of the light: blue, green and red. When it's developed, each layer forms a dye: yellow, magenta and cyan. Where a lot of light arrived, a lot of dye forms, which is why the negative is dark where the scene was bright.
The orange is the mask. Real dyes aren't perfect: magenta and cyan also absorb a little light that isn't theirs, and that would muddy the colors. To make up for it, the film carries a colored mask that corrects those impurities and tints the whole negative orange. Invert it, and the orange turns blue.
Removing the blue with white balance looks like the answer, but there's a second problem: the three layers don't have the same contrast. Each one responds to light with its own curve, so the difference between them changes with brightness. The correction that makes a shaded wall gray no longer works for a bright sky. Even if you set the levels of each channel separately, a cast remains that changes from the shadows to the highlights, and fixing it by hand with curves, channel by channel, takes a long time and almost never comes out the same in two photos.
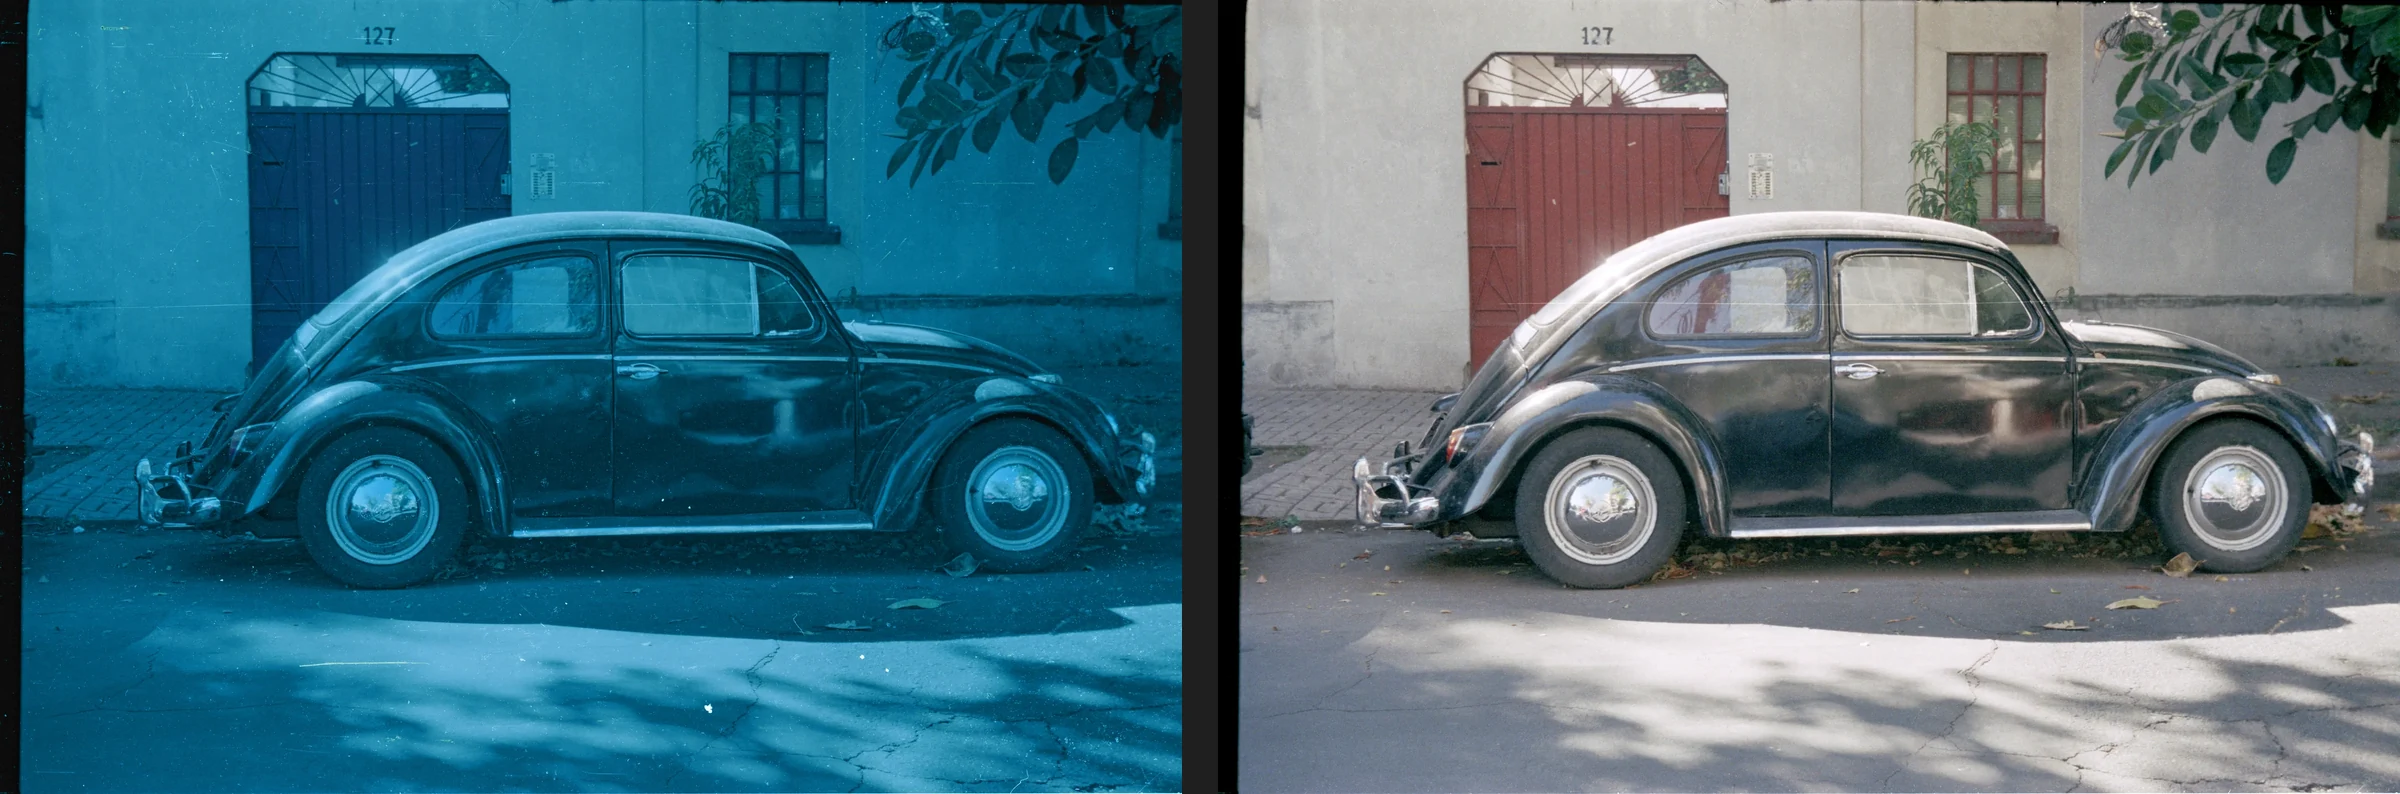
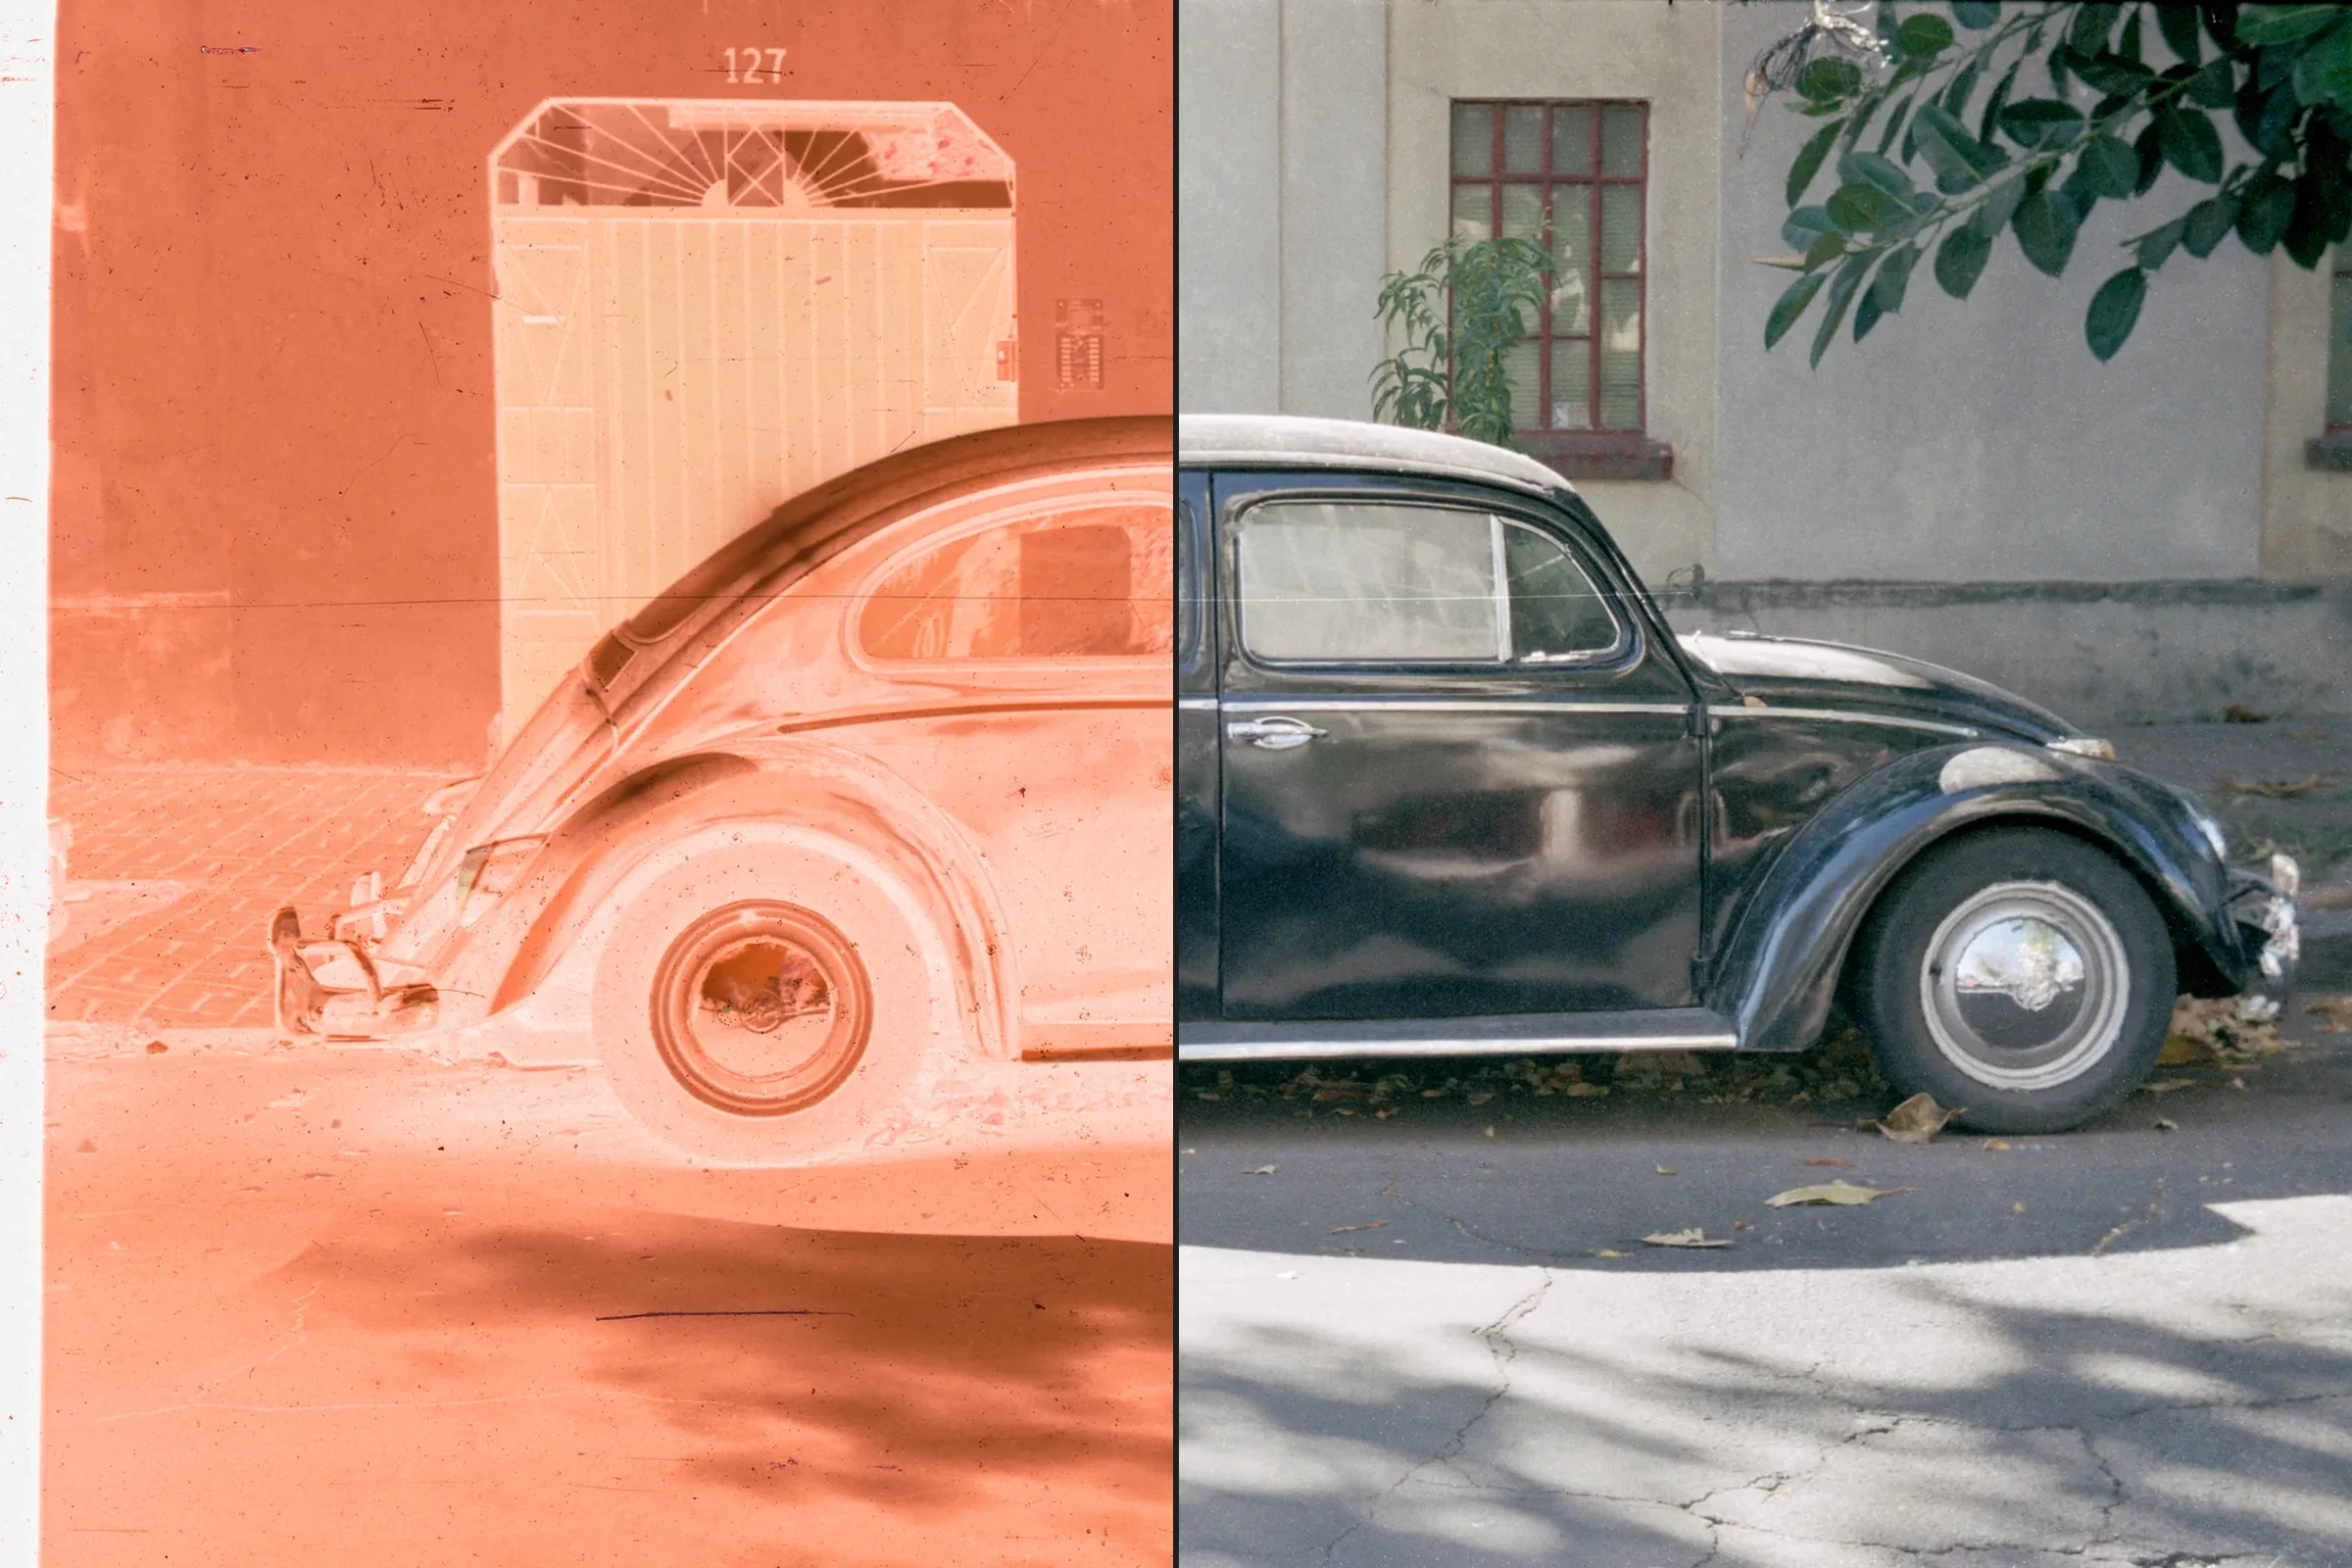
The cover's negative inverted and nothing else, on the left, and converted in Photisan, on the right. The gate is red.
What a lab does
A minilab doesn't invert the image: it measures it. Its work, simplified, has five parts, and they're worth knowing because the controls of Photisan's film conversion match them.
- Density. The lab doesn't think in brightness but in density: how much each point of the film blocks the light. It's the natural way to measure a negative, because that's how dyes add up.
- The base. Unexposed film, the border between frames, isn't clear: it has the density of the film's support and its mask. That base is measured and taken away, and what's left is the image.
- The film's curves. Each film's datasheet has the curve with which each layer responds to light. Reading the negative through those curves gives back the scene's light, with grays where they belong from the shadows to the highlights. That's why it matters which film it is.
- Gray and exposure. The scanner looks for what should be neutral, balances the three colors with it and sets the exposure of each frame, as the operator did when printing.
- The paper. Finally, the image is printed on a paper's curve, which gives it its blacks, its whites and its contrast. That's where much of each lab's character lies: two different scanners print the same negative differently.
With slides the ending changes: a slide is already a positive image, made to be seen with light behind it, so it isn't printed on paper. And a black and white negative has no mask and no color, but it has its base and its curve too.
Before converting: digitize well
A good conversion starts with a good digitization. Whether you use a film scanner or a camera, the point is to keep the negative as it is, with all its information, and leave the conversion for later.
- Clean the film. An air blower and gloves will save you a lot of retouching. Every speck of dust on the negative will be a white dot in the photo.
- With a scanner, turn off its automatic features. Disable inversion, color balance and automatic corrections in the scanner software, and save the negative as it is, as a 16-bit TIFF or a DNG. If the software offers a linear raw scan, that works too.
- With a camera, look after the light and the position. Use a macro lens, the film flat in a holder and an even backlight with good color quality. Keep the camera parallel to the film, focus on the grain and shoot RAW. The camera's white balance doesn't matter: the film base cancels it when you convert.
- Expose without clipping. The brightest part of a negative is the base. Make sure the histogram doesn't touch the right edge in any channel: whatever is clipped there is information no conversion can recover.
- Leave a bit of border. The film's unexposed border is the best reference for the base and helps tell what you scanned. You crop it afterwards.
- Don't edit first. No curves, balance, sharpening or noise reduction on the negative. All of that comes later, on the positive.
Film conversion in Photisan
In Photisan, converting doesn't change the scan's pixels. The conversion goes with the negative's layer as a row of its own below it, in the Layers panel, with its eye to show or hide it. You can adjust it whenever you like, and the negative stays untouched underneath.
It does the lab's steps in that same order: it measures the base, reads each layer through the curves of the film you choose, balances the grays, sets the exposure and prints on the paper curve of a lab style. It works with color negatives, black and white negatives and slides, and with what any way of digitizing delivers:
- Ordinary scans, as TIFF, JPEG or PNG, from any scanner.
- Linear DNGs from a scanner, like VueScan's or SilverFast's, which are read directly.
- Linear raw scans as TIFF (VueScan raw, SilverFast HDR), ticking the Linear scan box.
- Camera RAW files. If you photographed the negative, open the RAW as it is. When you convert it, Photisan develops it differently: it reads the sensor's linear light, channel by channel, like a scanner, with no curve, balance or profile, because the conversion adds them. In the development only lens correction and vignetting count, which helps even out a backlight that isn't even.
To read the curves well, it has those of many films, taken from their datasheets: among the color ones, Kodak Portra, Ektar, Gold, UltraMax and ProImage, Fujifilm 200 and 400, Superia, Pro 160NS and Pro 400H, and the Vision3 cinema films and CineStill; in black and white, Tri-X, T-MAX, Double-X, HP5 Plus, FP4 Plus, Delta 3200, XP2 Super and Acros; and among slides, Velvia, Provia and Ektachrome. If you don't know which one yours is, there's a generic one for each kind.
Step by step in Photisan
- Open the scan. When it recognizes a negative on opening, Photisan suggests converting it with a notice. If you photographed the film from the emulsion side and the image comes out mirrored, Image › Image rotation › Flip image horizontally puts it right.
- Convert it. With the scan's layer selected, go to Image › Convert scanned film. It's also in the Layer menu and in the command palette (⌘K, or Ctrl+K on Windows and Linux). Photisan recognizes whether it's a color negative, a black and white negative or a slide, from the orange mask or the border. If the image doesn't make it clear, it asks «What did you scan?», and there you can also tell it the image is already positive because the scanner converted it. When it's done, the Film conversion row appears below the layer, and the Adjustments panel shows its controls.
- Choose the film. Check that the kind is right (Colour negative, B&W negative or Slide) and choose the film from the menu. It's what changes the result most: with the right film, grays stay gray from the shadows to the highlights. The negative's border usually has its name or code printed on it. If you don't know it, leave Generic.
- Crop what isn't film and press Auto. With Crop, remove the holder and whatever surrounds the frame; if you're going to measure the base on the border (the next step), leave a thin strip of it. Then press Auto: it measures the base, the grays and the exposure again. Auto also clears any corrections you've made, so it's best used before fine-tuning.
- Measure the base and the gray. With Border, click the strip of unexposed film: the base is measured more precisely and the color of the whole photo cleans up. With Gray, click something that should be neutral gray, like a wall, asphalt or a cloud, to remove any cast that's left. In black and white it isn't needed, and Gray doesn't appear.
- Choose the lab. Frontier gives soft contrast, rich color, greens toward teal and cool shadows, in the style of Fuji Frontier scanners. Noritsu gives more contrast, deep blacks and warmer, more literal color. Neutral leaves the film as it is, on a plain paper curve. The first two are styles inspired by how those scanners print, not exact copies: choose the one you like for each photo.
- Fine-tune the print. The controls are the lab's when printing. Brightness lightens or darkens the whole print, like print density. Contrast changes the contrast without moving mid gray. Whites and Blacks decide where the paper's white and black fall: Auto puts them at the frame's brightest highlights and deepest shadows, and from there you can add sparkle to the highlights, bring them back, open the shadows or deepen the black. Warmth and Tint are the color filtration, toward amber or blue and toward magenta or green. In black and white only the first four are there.
- Calibrate the scanner with a good frame. Every scanner, and every camera with its light, reads the dyes a little differently from the instrument the datasheet was measured with, and always the same way. That leaves a cast that changes from the shadows to the highlights and that no film choice corrects. With the right film chosen, pick a frame with tones from the shadows to the highlights and press Calibrate scanner with this frame. Each frame you add refines the calibration, and Photisan remembers it and applies it by itself to what you convert afterwards. If you change scanner or light, Forget clears it so you can start again. It's only there for color films.
- Finish the crop. Remove the strip of border you left with Crop, and straighten if needed. Cropping doesn't change the conversion: what you adjusted stays the same.
- Remove the dust. If your scanner saves the infrared channel in a linear DNG, as VueScan can, select the scan's layer and tick Remove dust and scratches (infrared) in RAW development. Infrared goes through the dyes but not through dust, hairs or scratches, so Photisan knows exactly where they are and repairs each defect with the grain around it. Without infrared, the Spot healing brush and the Remove tool take care of what's left.
- Keep editing on top. The conversion is the lab's print; everything else goes on top. An adjustment layer on top, from the Layer menu or with Add adjustment layer in the Adjustments panel, gives you curves, color, black and white and everything else without touching the conversion, and color grading works on it just the same. If the negative came from a camera RAW, sharpening and noise reduction come now, on the positive, with the filters.
- Save and export. Photisan's PSD keeps the conversion editable. Photoshop doesn't know it and would see the negative, so if you're handing over the PSD, first right-click the Film conversion row and choose Turn film conversion into pixels (it's also in the Layer menu). When you export to JPEG or TIFF, the positive photo comes out, as you see it.
Black and white, and slides
- Black and white negatives. There's no mask and no cast to correct, so Gray, Warmth, Tint and calibration don't appear. The film does matter: a Tri-X, an HP5 and a T-MAX have very different curves, and choosing the right one changes how the tones spread from the shadows to the highlights.
- Slides. A slide is already positive, but the scanner sees it through its base and its curve, which is very contrasty. Photisan reads it with its film's curve and gives it back neutral, without printing it on paper, as when you projected it. It respects the exposure you gave it when shooting: if you want it lighter or darker, use Brightness. Unlike on a negative, dust on a slide comes out dark.
Converting a whole roll well takes less time than it seems: with the film chosen and the scanner calibrated, most frames come out right on the first click, and the rest is the usual, deciding how you want each photo to look.
If you don't have Photisan yet, download it and try it for free.